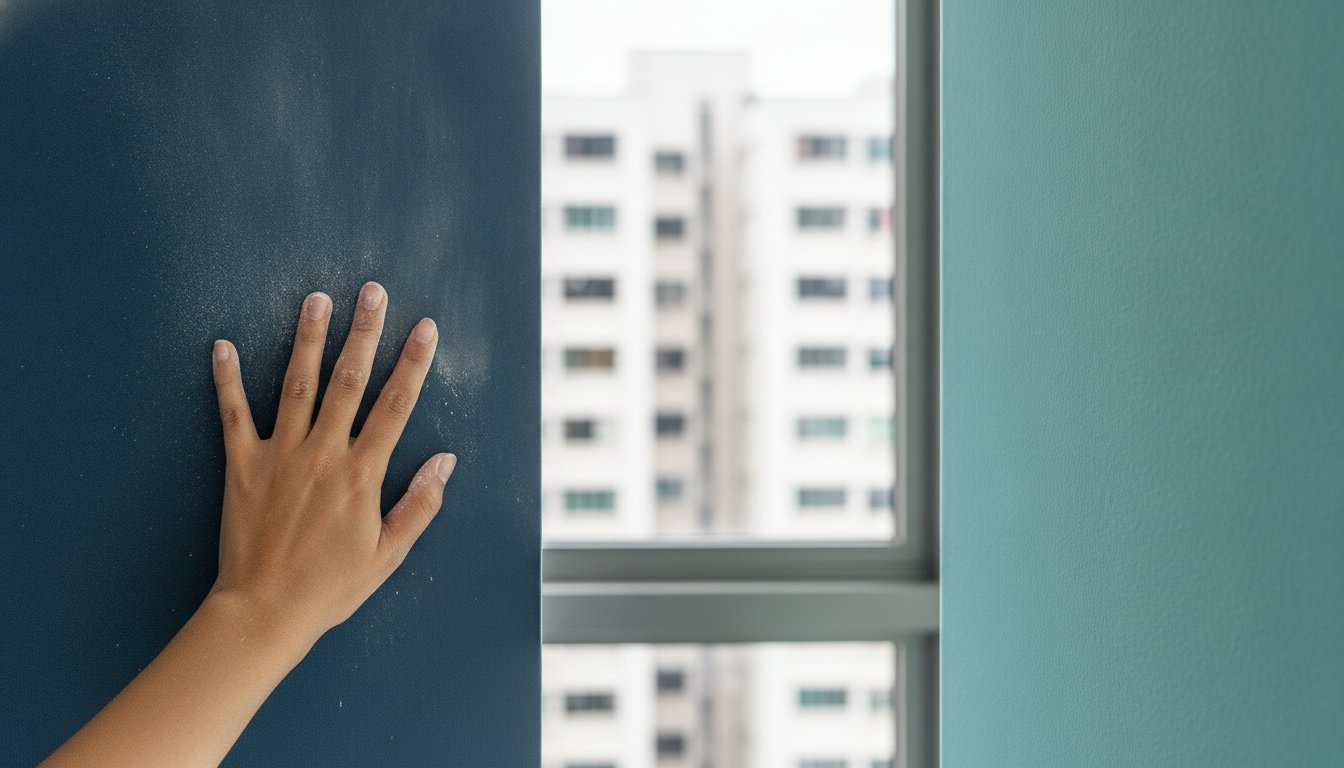
You lean against your living room wall in a fresh dark shirt, only to pull away and find it coated in a fine, ghostly white dust. This is a clear sign you need to know how to fix chalky paint on walls, as your paint’s chemical binder has failed under Singapore’s intense humidity and UV exposure. Many homeowners mistakenly believe a quick wipe or a standard coat of paint will solve the issue; however, they often find their expensive new finish peeling away in just a few months. It’s frustrating to feel like your home is deteriorating, especially when you’re unsure if that powder is chalking, mold, or salt deposits.
We understand that you want a home that feels as refined as it looks, without the stress of constant maintenance. This guide provides a definitive professional strategy to restore your surfaces once and for all. You will learn our proven 5-step restoration process, including how to select high-penetration sealers that meet the 2026 low-formaldehyde standards. We will move from initial surface preparation to the final application, ensuring a smooth, non-powdery finish that stands up to the toughest monsoon season.
Key Takeaways
- Perform the “Hand Test” to accurately distinguish between paint binder failure, surface dust, and salt deposits before starting your project.
- Follow our professional 5-step restoration process to learn how to fix chalky paint on walls and stop white powder from staining your belongings.
- Choose high-penetration oil-based sealers over standard primers to ensure a permanent bond that won’t peel off within months.
- Allow for extended drying times after deep cleaning to prevent tropical humidity from causing blisters and bubbles in your new finish.
- Understand why professional-grade water jetting is the most reliable way to strip “dead” paint layers for a long-lasting result.
Identifying Chalky Paint and Why it Plagues Singapore Homes
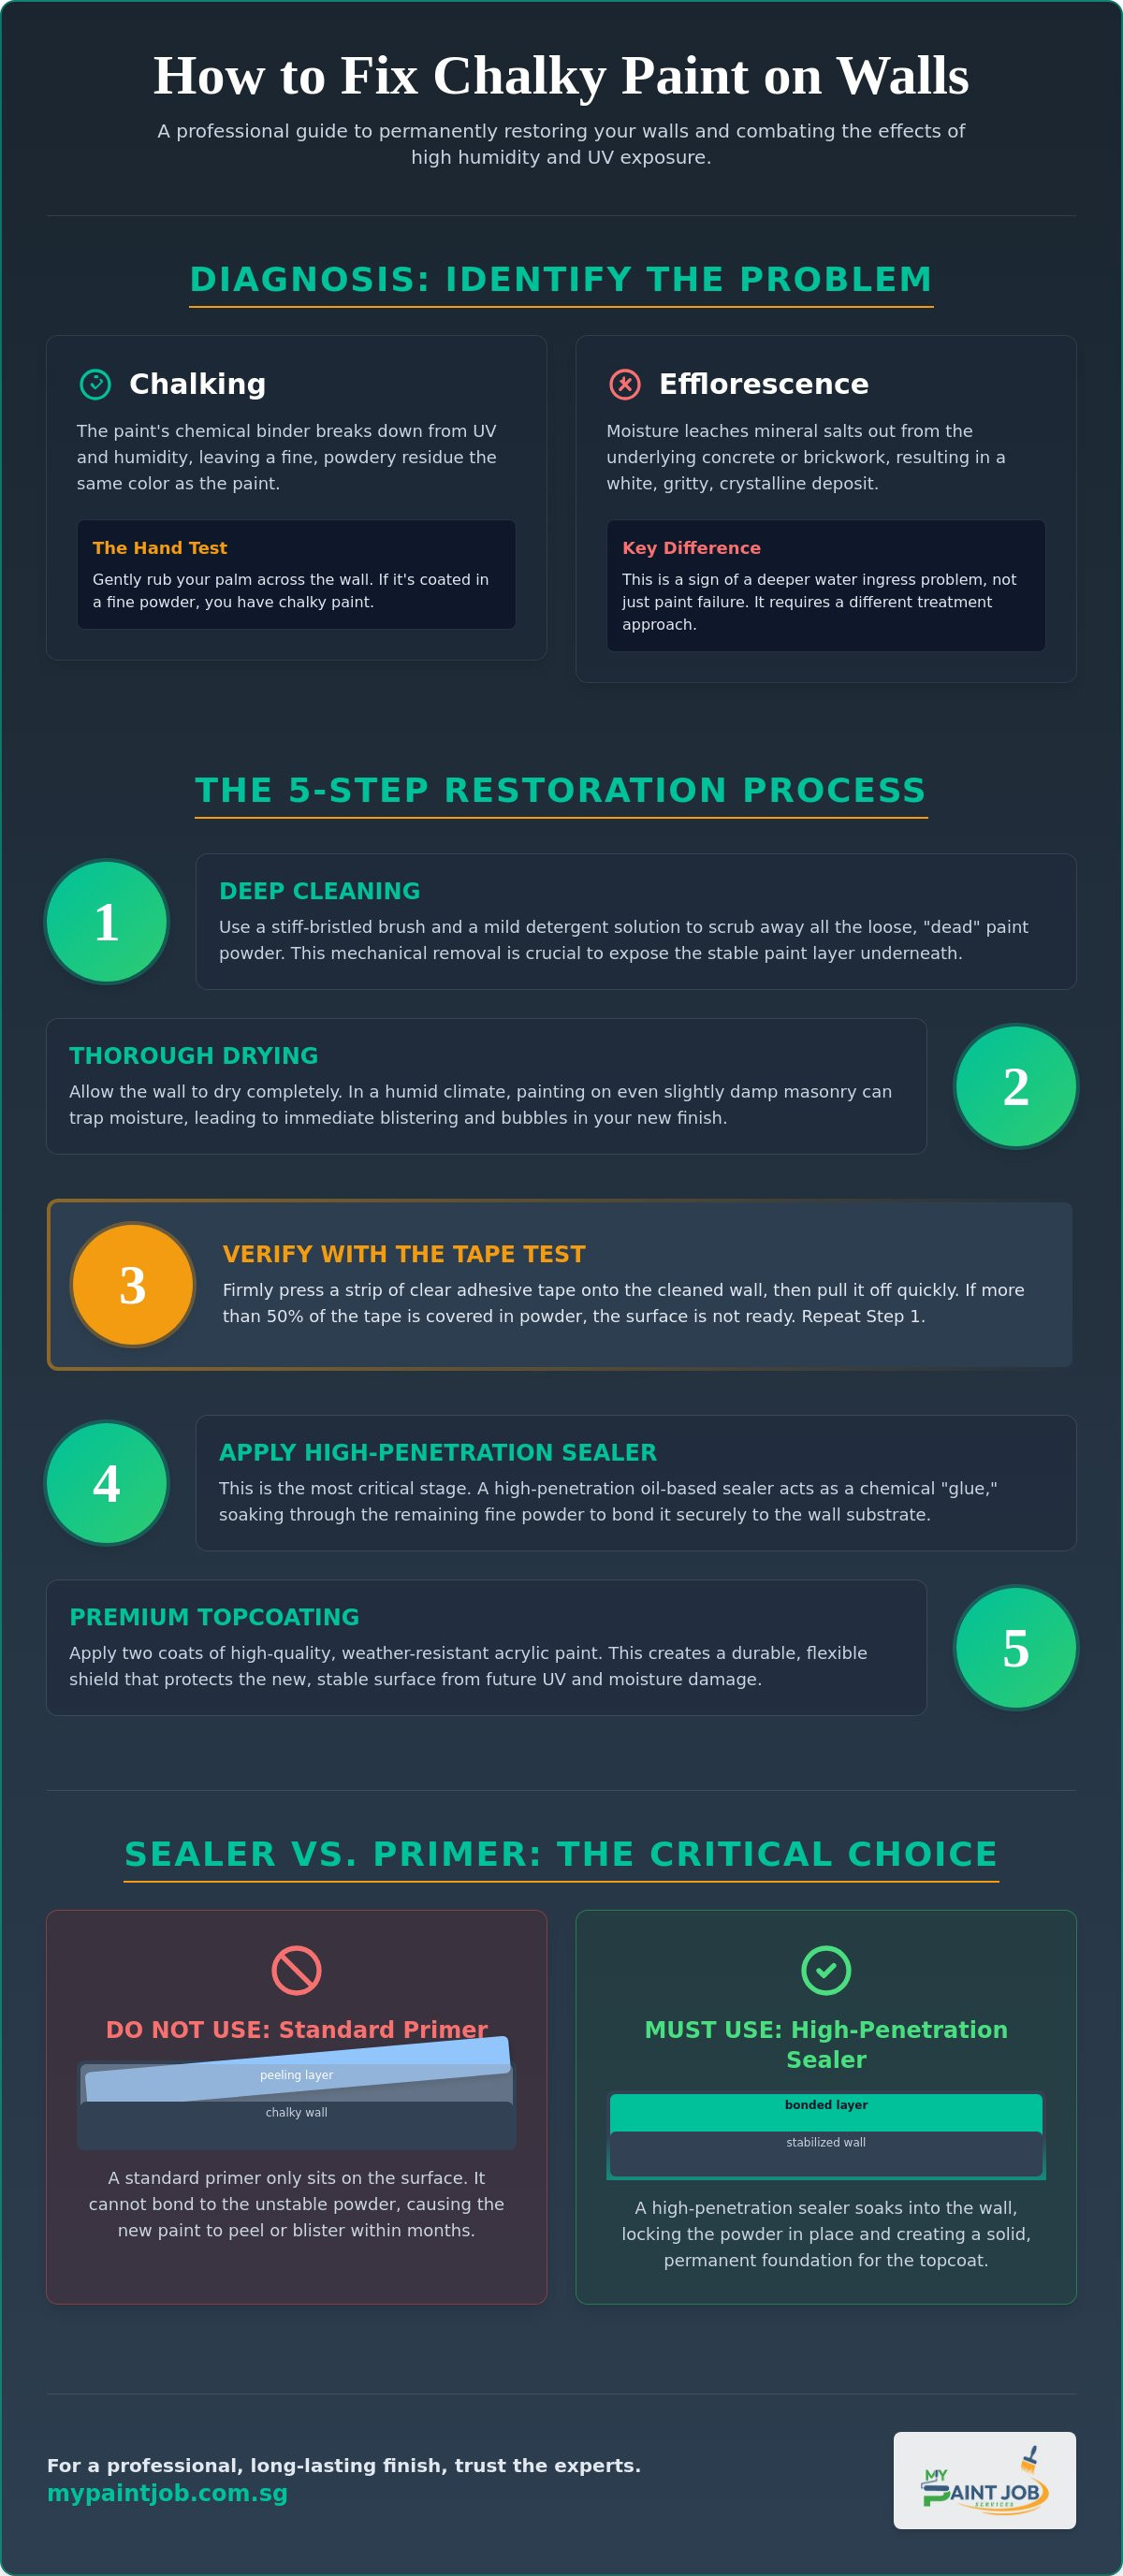
To achieve a flawless and enduring finish, you must first identify why your current paint is failing. Technically known as Chalking, this phenomenon occurs when the paint’s binder breaks down, leaving behind a fine, powdery white residue on the surface. When you are researching how to fix chalky paint on walls, it’s vital to realize that this powder isn’t just dirt; it’s the actual structure of your paint disintegrating. If you ignore this “release layer” and paint directly over it, your new coat will fail to bond. It will likely begin peeling or blistering within months, wasting both your time and investment.
Singapore’s tropical environment is particularly harsh on architectural coatings. Our local climate consistently maintains humidity levels above 80%, which, when combined with intense UV radiation, creates a high-stress cycle for exterior and interior surfaces. These environmental factors accelerate the degradation of low-grade acrylic binders. In our experience as local specialists, we often see this issue in HDB flats and condos where the original developer paint has reached the end of its lifespan. Understanding this chemical failure is the first step toward a permanent restoration that survives the monsoon season.
You can perform a simple “Hand Test” to confirm the issue. Gently run your palm across the affected area. If your hand is coated in a fine powder that matches the wall’s color, you are dealing with chalking. If the residue feels gritty or appears as crystalline structures, you might be facing a different moisture-related problem altogether.
Chalking vs. Efflorescence: Know the Difference
Distinguishing between these two issues is essential for choosing the right repair strategy. Efflorescence occurs when moisture leaches mineral salts out of the concrete or brickwork, resulting in a white, gritty deposit. While chalking is the paint itself breaking down, efflorescence is a sign of deeper water ingress. We find that plaster walls are often more susceptible to these issues if they weren’t properly sealed during the initial construction. To prevent future recurrences, you must ensure the surface is entirely stable and pH-neutral before applying any new decorative topcoats. Learning how to fix chalky paint on walls correctly starts with this precise diagnosis.
The 5-Step Professional Process to Fix Chalky Wall Surfaces
Restoring a powdery surface requires more than just a fresh coat of paint. To achieve a finish that doesn’t peel, you must follow a technical sequence that addresses the failed binder at its source. The only permanent solution for how to fix chalky paint on walls involves stabilizing the substrate before any decorative layers are applied.
- Step 1: Deep Cleaning. Use a stiff-bristled brush and a mild detergent solution to scrub away the “dead” paint layer. This mechanical removal is essential to expose the stable paint underneath.
- Step 2: Thorough Drying. Don’t rush into the next phase. In our humid climate, painting on even slightly damp masonry leads to immediate blistering. Ensure the wall is bone-dry to the touch.
The Professional Tape Test: How to Know You’re Ready
You can verify your progress using a simple diagnostic tool. Apply a 2-inch strip of clear adhesive tape to the cleaned wall and press it down firmly with your thumb. Pull the tape off in one quick motion. If more than 50% of the tape’s surface is covered in white powder, your cleaning was insufficient and you must repeat the scrubbing phase. The Tape Test is the industry standard for assessing substrate integrity before a hdb painting services singapore project.
- Step 4: Applying a High-Penetration Sealer. This is the most critical stage. When you are learning how to fix chalky paint on walls, remember that a sealer acts as a chemical “glue” that penetrates the remaining powder and bonds it back to the wall.
- Step 5: Premium Topcoating. Apply two coats of high-quality, weather-resistant acrylic paint. This creates a durable shield that protects the new binder from UV degradation and moisture.
Following this meticulous process ensures your home remains vibrant and dust-free for years. If you find the preparation phase too labor-intensive, the specialists at mypaintjob.com.sg are always available to handle the technical heavy lifting for you.
Choosing the Right Sealer and Paint to Prevent Recurrence
Selecting the correct chemical bond is the most overlooked part of how to fix chalky paint on walls. Many DIY enthusiasts reach for a standard primer, but this is a technical error. Primers are generally too thick to move through the microscopic gaps in a degraded paint film. They simply sit on top of the powder, creating a weak layer that will eventually delaminate. You need a specialized sealer designed to “wet” the surface and soak into the masonry to ensure a permanent fix.
For heavily chalking exterior walls, oil-based sealers remain the gold standard. Their superior wetting properties allow them to penetrate deep into the old paint layers, effectively re-binding the loose particles. Inside your home, water-based sealers are often the better choice. They offer excellent adhesion with the added benefit of low odor and faster drying times. This is essential for maintaining a comfortable living environment while you learn how to fix chalky paint on walls.
Top Recommended Materials for Singaporean Walls
We often evaluate premium options like Nippon Vinilex 5000 against high-performance technical sealers to find the best fit for each property. In Singapore’s harsh sun, look for topcoats with exceptionally high resin content. These “chalk-resistant” paints act as a shield against UV radiation, preventing the binder from breaking down again. When you engage professional house painting services, ensure they are using eco-friendly, low-VOC options. As of January 1, 2026, all interior paints sold in Singapore must contain less than 0.01% formaldehyde, ensuring your refreshed space is as healthy as it is beautiful.
If you aren’t sure which product matches your wall’s current condition, you can always request a professional painting consultation to ensure a high-standard result.
Restoring Your Walls: DIY vs. Professional Painting Services
While the technical steps for how to fix chalky paint on walls seem straightforward, the execution is where most home projects falter. In Singapore, poor surface preparation remains the leading cause of paint failure. If you don’t remove every trace of the powdery “dead” layer, your expensive new topcoat is essentially floating on a bed of dust. This lack of a solid bond leads to peeling and delamination, often requiring a complete redo within six months.
Professionals bring specialized equipment that ensures a high-standard result. For exterior surfaces, we use high-pressure water jetting to achieve 100% removal of chalking residue. This mechanical deep-clean creates a pristine substrate that manual scrubbing simply cannot match. When you factor in the cost of high-performance sealers, specialized rollers, and the physical labor involved, engaging a specialist is a strategic investment in your property’s longevity. The My Paint Job Singapore advantage lies in our 10+ years of experience in HDB and condo restoration, ensuring your home is in safe, capable hands.
When to Call a Professional Contractor
There are specific scenarios where a DIY approach is no longer viable. If you discover spalling concrete, deep structural cracks, or widespread chalking on high-rise exterior walls, you need expert intervention. These issues suggest that moisture has penetrated deep into the masonry, requiring technical repairs before any painting can begin. To ensure your walls are restored correctly the first time, get a free, no-obligation quote from My Paint Job Singapore. We take pride in our meticulous prep-to-finish process, transforming your living environment with technical accuracy and a commitment to lasting craftsmanship. Let us help you master how to fix chalky paint on walls with a permanent, professional solution.
Restore Your Home’s Beauty with Technical Precision
You now have the technical knowledge to address paint binder failure at its root. By utilizing the professional Tape Test and selecting high-penetration sealers, you can ensure your next renovation withstands the unique challenges of our tropical climate. Understanding how to fix chalky paint on walls is about more than just aesthetics; it’s about protecting the structural integrity of your HDB or condo for the long term. A stable, well-prepared surface is the only way to achieve a vibrant finish that won’t peel or stain your clothes.
If you prefer to leave the meticulous preparation and specialized application to the experts, our team is here to support you. With over 10 years of experience in Singapore, we provide a seamless restoration process that includes comprehensive furniture protection and thorough post-project clean-up. We exclusively use premium, eco-friendly paints tailored for local humidity to ensure a healthy and vibrant environment for your family. Book a professional site inspection for your chalky walls today to see the difference that dedicated craftsmanship makes. You deserve a home that feels as clean and polished as the day you first moved in.
Frequently Asked Questions
Is chalky paint on walls dangerous to breathe in?
Chalky paint residue is generally not toxic, but the fine dust can act as a respiratory irritant if it becomes airborne during cleaning. If your home was built before the 1980s, there is a minor risk that the old paint layers contain lead, which is hazardous if inhaled. We always recommend using wet-cleaning methods and wearing a basic N95 mask to ensure your safety while removing the degraded binder from your walls.
Can I just wash the chalk off and not paint the wall?
Washing the wall provides only a very temporary solution and will not stop the chalking from returning. Because the chemical binder in the paint has already failed, the surface will continue to break down and produce new powder as soon as it dries and is exposed to air. You must apply a sealer to “lock in” the remaining paint and a new topcoat to provide a fresh layer of UV protection.
What is the best sealer for very chalky exterior walls in Singapore?
Oil-based sealers are the most effective choice for heavily chalking exterior walls because they have superior “wetting” and penetration properties. These sealers soak through the failed powder to re-attach it to the solid masonry underneath. When you are deciding how to fix chalky paint on walls on a landed property or condo balcony, a solvent-based sealer provides the strongest possible bond against our intense tropical sun.
How long does it take for a fixed chalky wall to dry before repainting?
Drying times depend on the sealer type, but you should generally wait between 4 to 12 hours before applying a topcoat. Water-based sealers often dry in about 2 to 4 hours, whereas oil-based sealers require a minimum of 8 hours, or ideally overnight, to cure fully in Singapore’s humidity. Rushing this process can trap moisture, so it’s best to ensure the surface is completely tack-free before you continue.
Will a 5-room HDB flat need more than one coat of sealer for chalking?
A single, thorough coat of premium sealer is usually sufficient for most 5-room HDB flats if the surface has been scrubbed clean. However, if the walls are extremely porous or the powdering was severe, a second coat ensures a uniform foundation for your new color. This is a critical part of how to fix chalky paint on walls because it prevents the final paint from soaking in unevenly, which often causes a patchy or dull appearance.