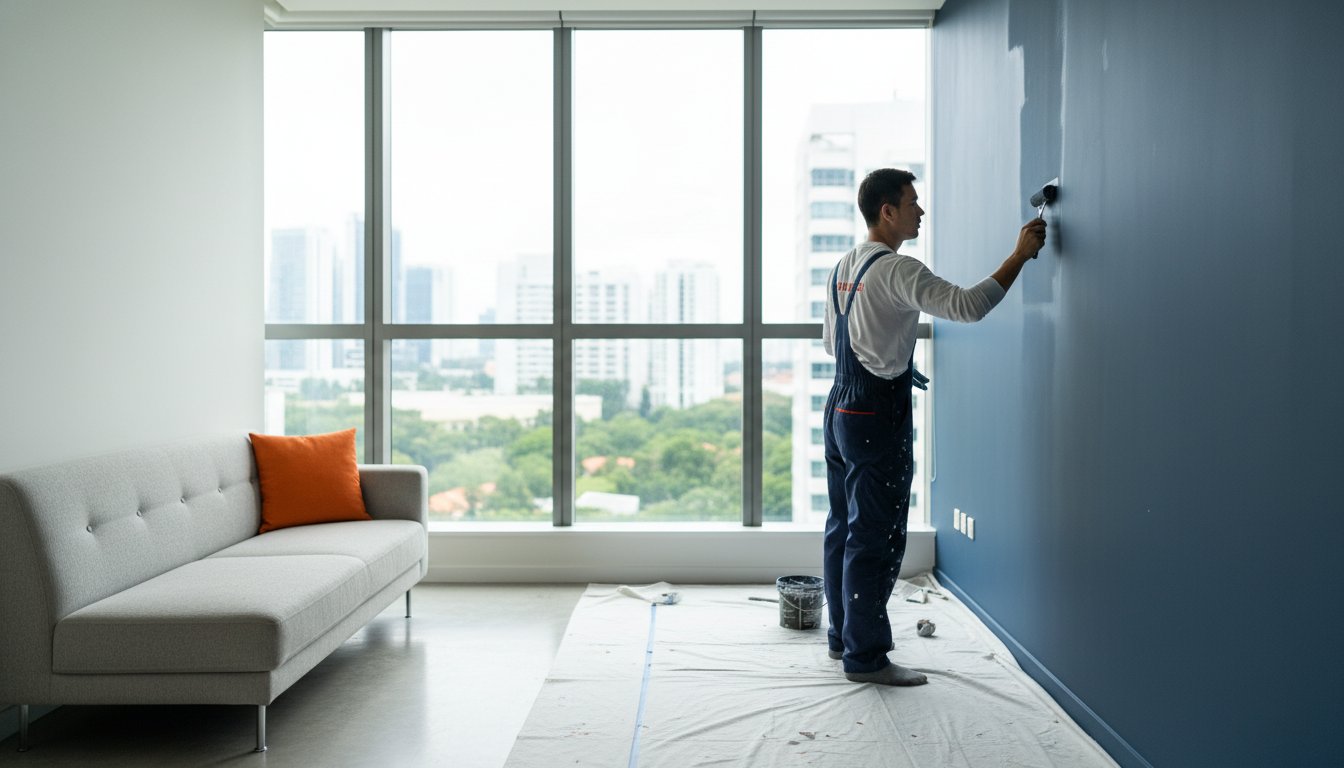
That small, raised blister on your living room wall isn’t just an aesthetic annoyance; it’s often a silent signal that the bond between your paint and the structure has failed. We understand how frustrating it is to see a once-perfect surface ruined by unsightly textures, especially after you’ve already invested time and money into a DIY fix. When it comes to fixing paint bubbles on wall surfaces, the secret lies in addressing the root cause rather than just masking the symptoms. Whether you’re dealing with an HDB flat or a landed property, these bubbles are frequently moisture-driven warnings that require technical restoration to prevent recurring issues or hidden damage.
You deserve a home that reflects your pride in ownership with a perfectly smooth, durable finish. This guide provides the professional methods needed to diagnose, repair, and prevent paint bubbling to ensure your walls remain pristine for years to come. We will examine the critical distinctions between moisture-related failures and preparation errors, helping you decide when to handle a minor touch-up and when to call in a specialist for spalling concrete repair or professional plastering. By understanding the science behind the adhesion, you can protect your property from mold and structural decay while achieving a high-standard result that lasts.
Key Takeaways
- Identify how Singapore’s unique humidity levels and internal condensation trigger adhesion failure, turning smooth walls into problematic, bubbled surfaces.
- Master the technical steps for fixing paint bubbles on wall areas, from careful scraping to establishing a stable, repair-ready edge for a seamless finish.
- Distinguish between simple cosmetic blisters and serious structural warnings like spalling concrete or external water seepage that require specialized intervention.
- Apply the “clean, dry, and dull” preparation standard to guarantee a professional-grade bond for your next coat of paint.
- Utilize environmental control strategies, such as enhanced ventilation and dehumidification, to prevent future moisture-driven damage and ensure long-term restoration success.
Why Is Your Wall Paint Bubbling? Identifying the Root Causes
Paint bubbling, also known as blistering, occurs when the finished film lifts away from the underlying surface. This separation creates pockets filled with either air or trapped moisture. To succeed in fixing paint bubbles on wall surfaces, you must first recognize that these blisters are a symptom of a deeper adhesion failure. A foundational step in understanding paint composition is realizing that every layer depends on a clean, stable bond to the substrate below. When that bond breaks, your wall’s aesthetic integrity is compromised.
In 2026, we see an increase in bubbling caused by extreme heat and intense sunlight, especially on exterior walls or near unshaded windows. Rapid temperature changes cause the paint to expand and contract at a different rate than the wall, leading to localized lifting. Additionally, contamination from dust, grease, or residual moisture during the previous application can lead to delayed bubbling months after the job is finished. These contaminants act as a barrier that prevents the paint from ever truly anchoring itself.
The Difference Between Dry and Wet Bubbles
Identifying the contents of a bubble helps pinpoint the source of the trouble. Dry blisters usually contain only air and are typically caused by heat or air trapped during the application process. In contrast, wet blisters contain liquid. These are a clear sign of water seepage or plumbing leaks behind the wall. Fix the leak before attempting any surface repairs, or the new coat will eventually suffer the same fate.
The Impact of Singapore’s Humidity on Adhesion
Singapore’s climate presents unique challenges that standard DIY paints often can’t handle. Our humidity frequently exceeds 80%, creating a ‘monsoon effect’ that prevents paint from curing properly. Without professional-grade sealers, moisture becomes trapped within the wall structure. This is particularly common in non-ventilated HDB utility rooms where stagnant air allows condensation to settle. Fixing paint bubbles on wall areas in these environments requires specialized moisture-resistant treatments to ensure the new finish remains perfectly smooth despite the tropical climate.
The Step-by-Step Guide to Fixing Paint Bubbles on Wall
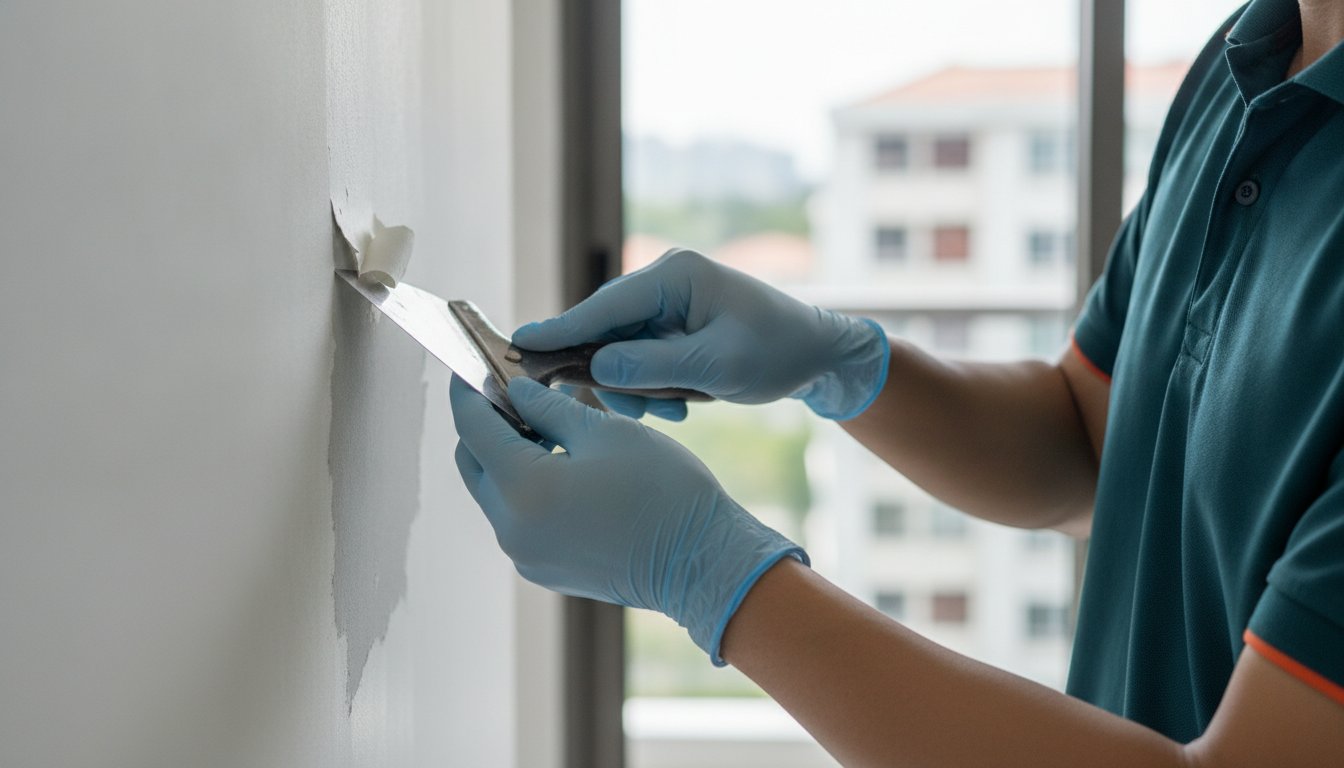
Restoring a damaged surface requires more than a quick patch; it demands a disciplined, multi-stage process to ensure the issue doesn’t return. Before you begin fixing paint bubbles on wall areas, clear the workspace and protect your furniture with heavy-duty drop cloths. It’s vital to identify the full extent of the damage first, as moisture often travels further beneath the surface than the visible blister suggests. A thorough inspection ensures you aren’t just treating a symptom but preparing for a permanent solution.
Start by using a flexible putty knife to scrape away all loose or brittle paint. You must continue this process until you reach a stable edge where the remaining paint is firmly bonded to the substrate. This prevents the new coat from lifting along the old fracture lines. Once the loose material is gone, the wall is ready for smoothing and structural reinforcement.
Professional Scraping Techniques
Precision is essential during the removal phase. Hold your knife at a shallow angle to avoid gouging the underlying masonry or drywall. A common professional secret involves removing an additional 2-inch perimeter around the visible bubble. This extra clearance ensures you’ve reached a zone of total adhesion, providing the long-term stability needed for a flawless restoration. It’s a small step that makes a massive difference in durability.
Choosing the Right Patching Compound
The depth of the damage dictates your material choice. While standard putty works for superficial nicks, deeper structural issues or widespread texture problems require high-quality plaster to level the surface effectively. In our humid environment, you can’t rush the drying process. Allow the compound to dry completely before sanding, as trapped moisture in the patch will trigger the same bubbling cycle you’re trying to break. If the damage looks extensive, our condo painting services offer the meticulous craftsmanship required for these technical repairs.
Once the surface is sanded smooth and wiped free of dust, apply an alkaline-resistant sealer. This specialized primer acts as a critical barrier against the salts and moisture often found in concrete walls. Finish with a high-quality topcoat, applying thin, even layers to achieve a professional-grade finish that resists the elements and looks spectacular.
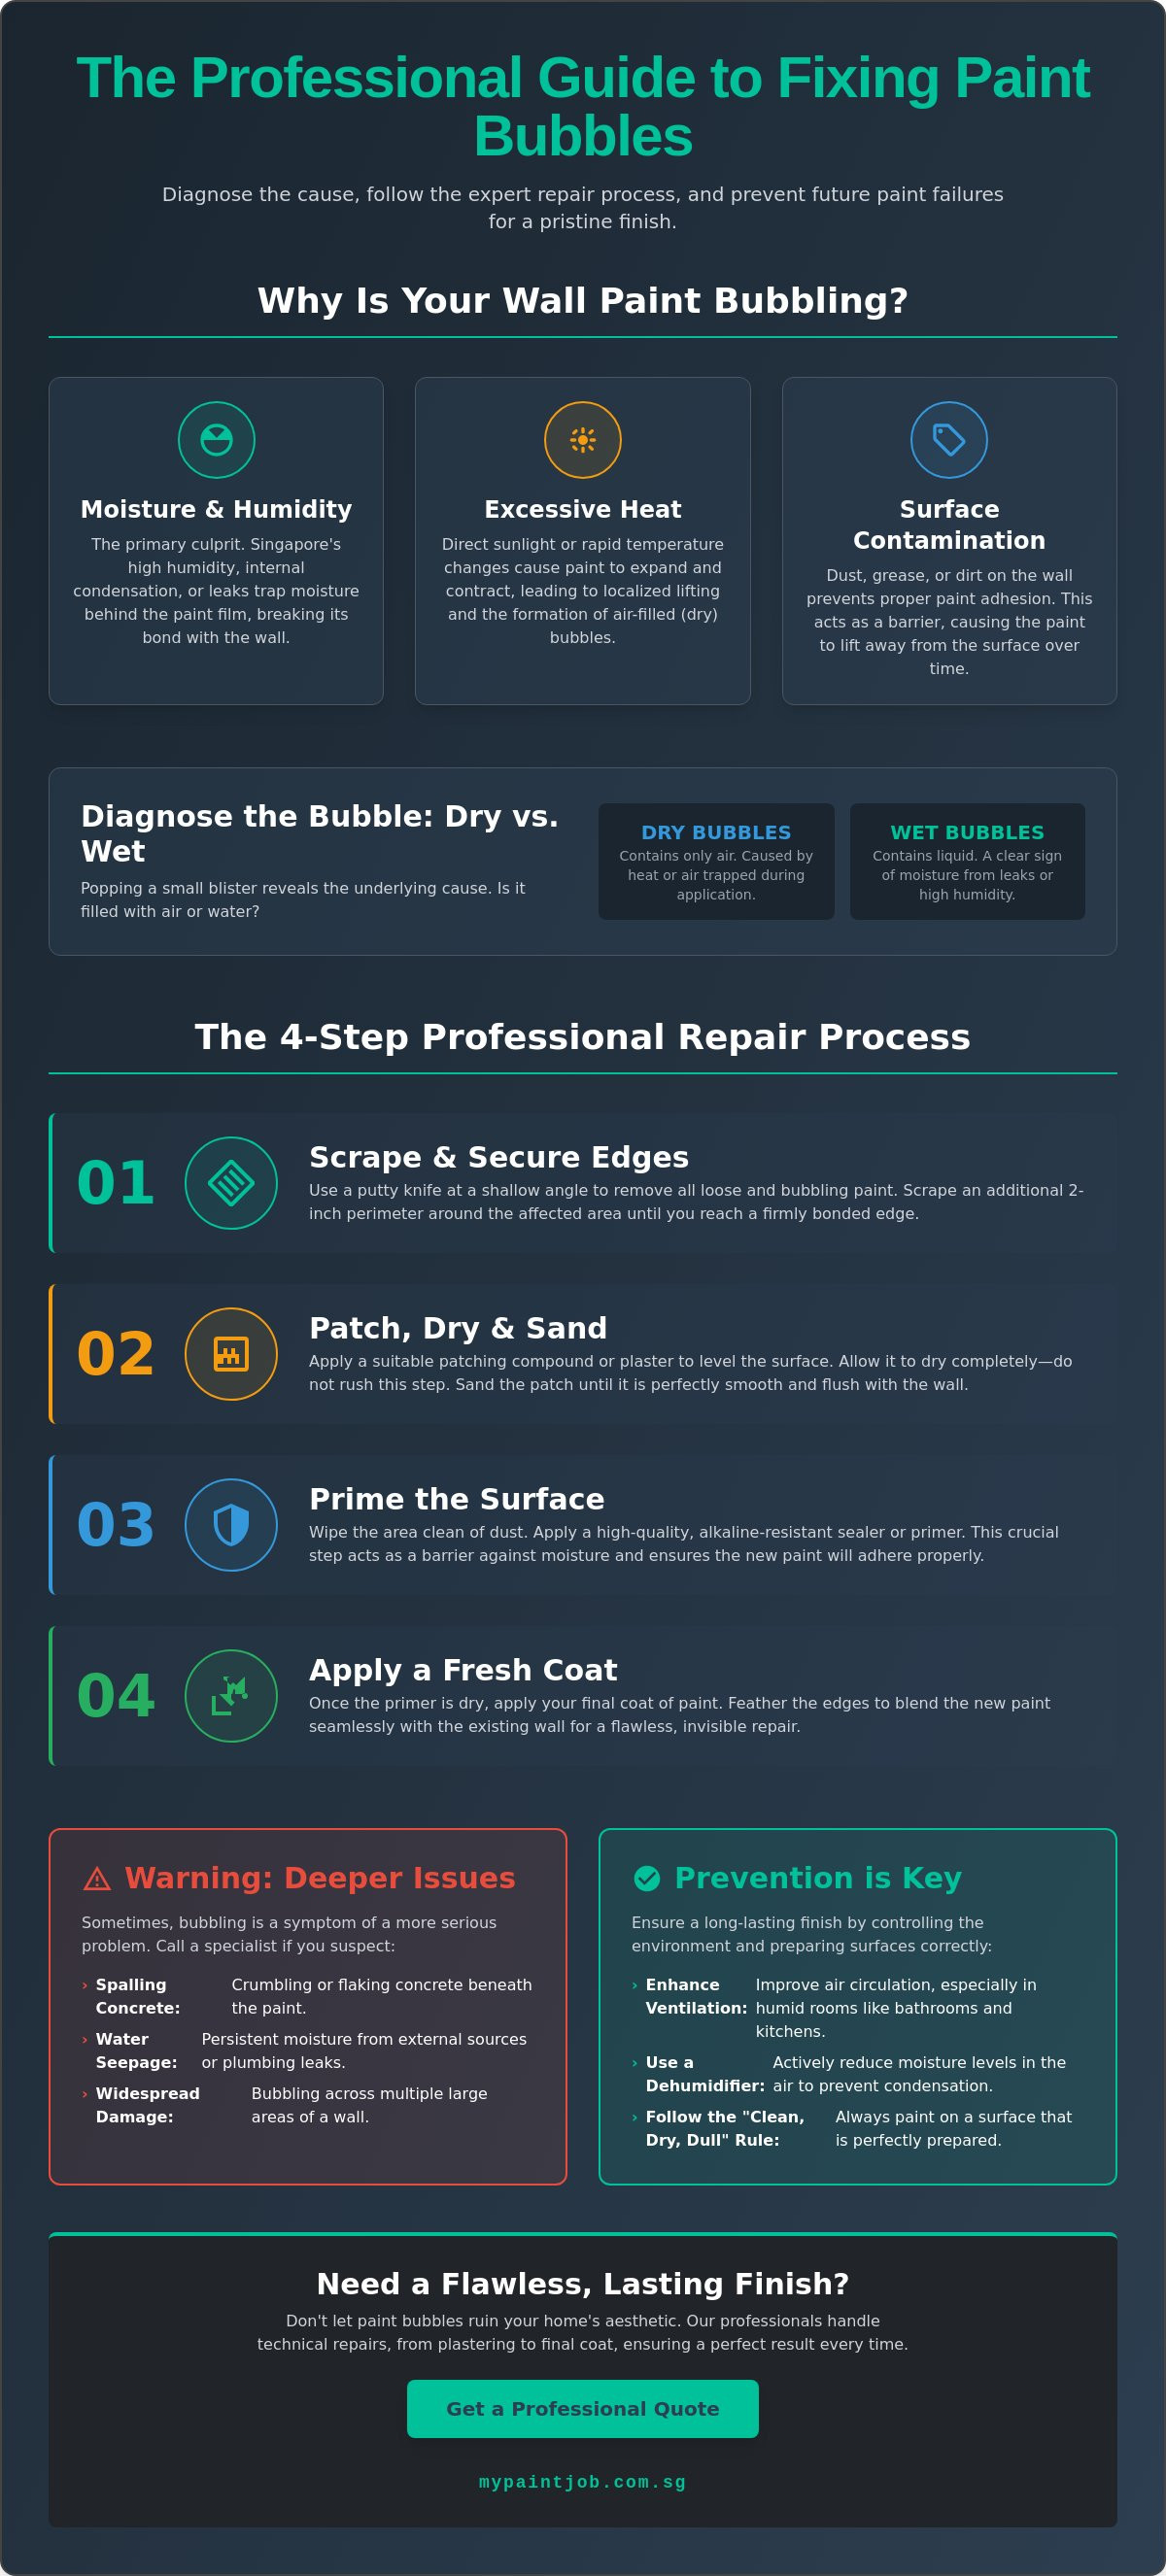
When Bubbling Signals Deeper Issues: Spalling and Seepage
Not all blisters are created equal. If your attempt at fixing paint bubbles on wall areas reveals rust-colored stains or hairline cracks in the concrete, you’ve encountered a structural issue. These signs often point to spalling concrete, a condition where the steel reinforcement bars inside the slab begin to corrode. As the rust expands, it exerts immense pressure on the concrete, causing the paint to lift and the surface to flake away. Ignoring these signals can lead to falling debris and compromised safety.
The HDB Spalling Concrete Connection
In many older HDB flats, the carbonation process gradually neutralizes the alkalinity of the concrete. This allows moisture and oxygen to reach the rebar, leading to rust. Because this is a structural failure, a simple coat of paint will only mask the problem temporarily. You must engage a specialist for spalling concrete repair to treat the rusted steel and patch the area with non-shrink grout. This technical restoration ensures the wall remains stable and the finish stays smooth for years.
Addressing External Wall Seepage
Persistent bubbling on walls shared with the exterior or a neighbor’s bathroom often indicates water seepage. External rain penetration can soak through porous masonry, pushing the paint film off from the inside. Identify the entry point by checking for damp patches during heavy storms. Applying specialized external sealers to the building’s facade is the only way to protect your interior restoration. Without stopping the source of the water, no amount of interior prep work will prevent the bubbles from returning.
Protect your family’s health by addressing mold growth immediately. Trapped moisture behind a paint film creates an ideal breeding ground for fungi. If you notice recurring bubbles in the same spot, request a professional moisture meter test to confirm if the issue is atmospheric or structural. Our team provides expert HDB painting services to diagnose these complex issues and deliver a lasting, professional-grade finish.
Prevention and Professional Restoration Strategies
A smooth wall is a dry wall. To avoid the repetitive cycle of fixing paint bubbles on wall surfaces, you must adhere to the professional ‘clean, dry, and dull’ rule during every restoration. This standard ensures that the substrate is free of contaminants, moisture-free, and sufficiently abraded to allow for mechanical bonding. In our tropical climate, achieving this state often requires more than just waiting for a sunny day; it requires active environmental control.
Utilize dehumidifiers and high-velocity fans during the painting process to manage internal condensation. These tools are essential in 2026 as they ensure that the paint cures according to the manufacturer’s technical specifications. Additionally, prioritize material selection by choosing premium, eco-friendly paints with high vapor permeability. These advanced coatings allow the wall to ‘breathe,’ letting microscopic amounts of moisture escape without forcing the paint film to lift or blister.
Why Professional Painting Saves Money Long-Term
While a DIY approach might seem cost-effective, a professional house painting service provides the diagnostic expertise to identify moisture issues before the first drop of paint is applied. Professionals use calibrated moisture meters to ensure the substrate is ready, preventing the need for expensive repainting every two years. By using industrial-grade sealers and specialized application techniques, experts create a resilient barrier that withstands the unique pressures of Singapore’s high-humidity environments.
The My Paint Job Singapore Difference
With over 10 years of experience managing humidity-induced bubbling in HDBs, condos, and landed properties, we take immense pride in our technical accuracy and craftsmanship. We don’t just cover up flaws; we restore the integrity of your home’s surfaces. Our team ensures meticulous furniture protection and a thorough post-project clean-up, leaving you with nothing but a flawless, durable finish. We view every project as a creative achievement and a commitment to your property’s long-term health. Contact My Paint Job Singapore for a professional wall assessment and quote today.
Achieve a Flawless Finish for Your Home
Achieving a smooth, durable wall surface requires a balance of technical accuracy and high-quality materials. We’ve explored how fixing paint bubbles on wall areas is rarely just a cosmetic task; it’s a diagnostic process that addresses humidity, surface prep, and structural health. By identifying the root cause early, you protect your property from the risks of mold and structural decay. It’s about moving beyond temporary patches to secure a long-lasting, aesthetic result that stands up to Singapore’s unique climate.
The team at My Paint Job Singapore brings over 10 years of local experience to every project, specializing in meticulous HDB and Condo restoration. We utilize premium eco-friendly paint options to ensure your home remains a healthy, beautiful environment for your family. Don’t let persistent wall blisters diminish the value of your living space. Take the first step toward a lasting transformation by securing an expert assessment from a partner who values craftsmanship as much as you do.
Book a Professional Wall Inspection and Painting Quote
Your property is a significant investment, and it deserves a finish that reflects your pride in ownership. We are here to help you navigate these technical challenges with ease, ensuring your walls remain pristine and resilient for years to come.
Frequently Asked Questions
Can I just paint over bubbles on the wall?
You should never simply paint over existing blisters. The new coat will only trap air or moisture more effectively, and because the underlying layer has already lost its bond, the fresh paint will quickly peel away. Successful restoration starts with scraping the surface down to a stable edge. Fixing paint bubbles on wall areas requires this foundational prep work to ensure the new finish remains smooth and durable.
How long should I wait for plaster to dry before repainting in Singapore’s humidity?
We recommend waiting at least 24 to 48 hours for plaster or skim coating to dry completely in Singapore’s typical humidity. If the patch feels cool to the touch or looks slightly dark, it’s still holding moisture. Painting too early will trap that dampness and cause the new film to blister. Use a fan or dehumidifier to speed up this process and ensure a reliable bond for your topcoat.
Are paint bubbles always caused by water leaks?
Bubbles aren’t always a sign of a plumbing leak. While water seepage is a common culprit, blistering can also result from intense heat, high atmospheric humidity, or painting over a dusty surface. Identifying whether a bubble is “dry” or “wet” helps determine if the issue is environmental or structural. Regardless of the cause, identifying the source is the first step toward a permanent repair.
What is the best primer to prevent future paint bubbling?
Use a high-quality, alkaline-resistant sealer to provide the best protection against future bubbling. This specialized primer creates a robust barrier that prevents salts and moisture within the concrete from attacking the paint film. For high-moisture areas like bathrooms or kitchens, choose a primer with high vapor permeability. This allows the wall to breathe while maintaining a strong mechanical bond with the topcoat.
Is paint bubbling covered by HDB maintenance or is it the homeowner’s responsibility?
Internal painting and surface maintenance are generally the homeowner’s responsibility. However, if the bubbling is caused by structural issues like spalling concrete or external seepage in an HDB flat, you should contact your Town Council for an assessment. While they may handle structural repairs to the concrete slab, the subsequent aesthetic restoration and fixing paint bubbles on wall surfaces typically remain the owner’s responsibility.