

In Singapore’s relentless humidity, a hairline crack is never just a cosmetic blemish; it is an open invitation for moisture to undermine your home’s integrity. You have likely felt that sinking feeling when a thin, spiderweb line reappears on your wall just weeks after a fresh coat of paint. It is frustrating to invest your hard-earned money into a renovation only to see the same old imperfections staring back at you within a month. Many homeowners worry if these marks are simple settlement or the start of serious spalling concrete issues.
Learning how to repair hairline cracks in walls before painting is the essential first step to achieving a professional finish that actually lasts. We believe in craftsmanship that stands the test of time, and we want to share the technical accuracy needed to protect your property. This guide provides a clear roadmap to identifying different crack types and applying the right sealants for our tropical climate. You will discover the exact steps to prepare your surfaces so your next paint job remains flawless and your mind stays at ease.
Key Takeaways
- Learn to distinguish between superficial shrinkage and serious structural issues like spalling concrete to protect your property’s long-term value.
- Master the technical 5-step process for how to repair hairline cracks in walls before painting to ensure your new finish remains flawless despite the humidity.
- Discover why “raking out” cracks into a V-shape is the secret to superior adhesion and a smooth, professional wall finish.
- Understand the critical role of professional plastering and skim coating in creating a moisture-resistant barrier for older Singaporean homes.
Understanding Hairline Cracks in Singapore Homes
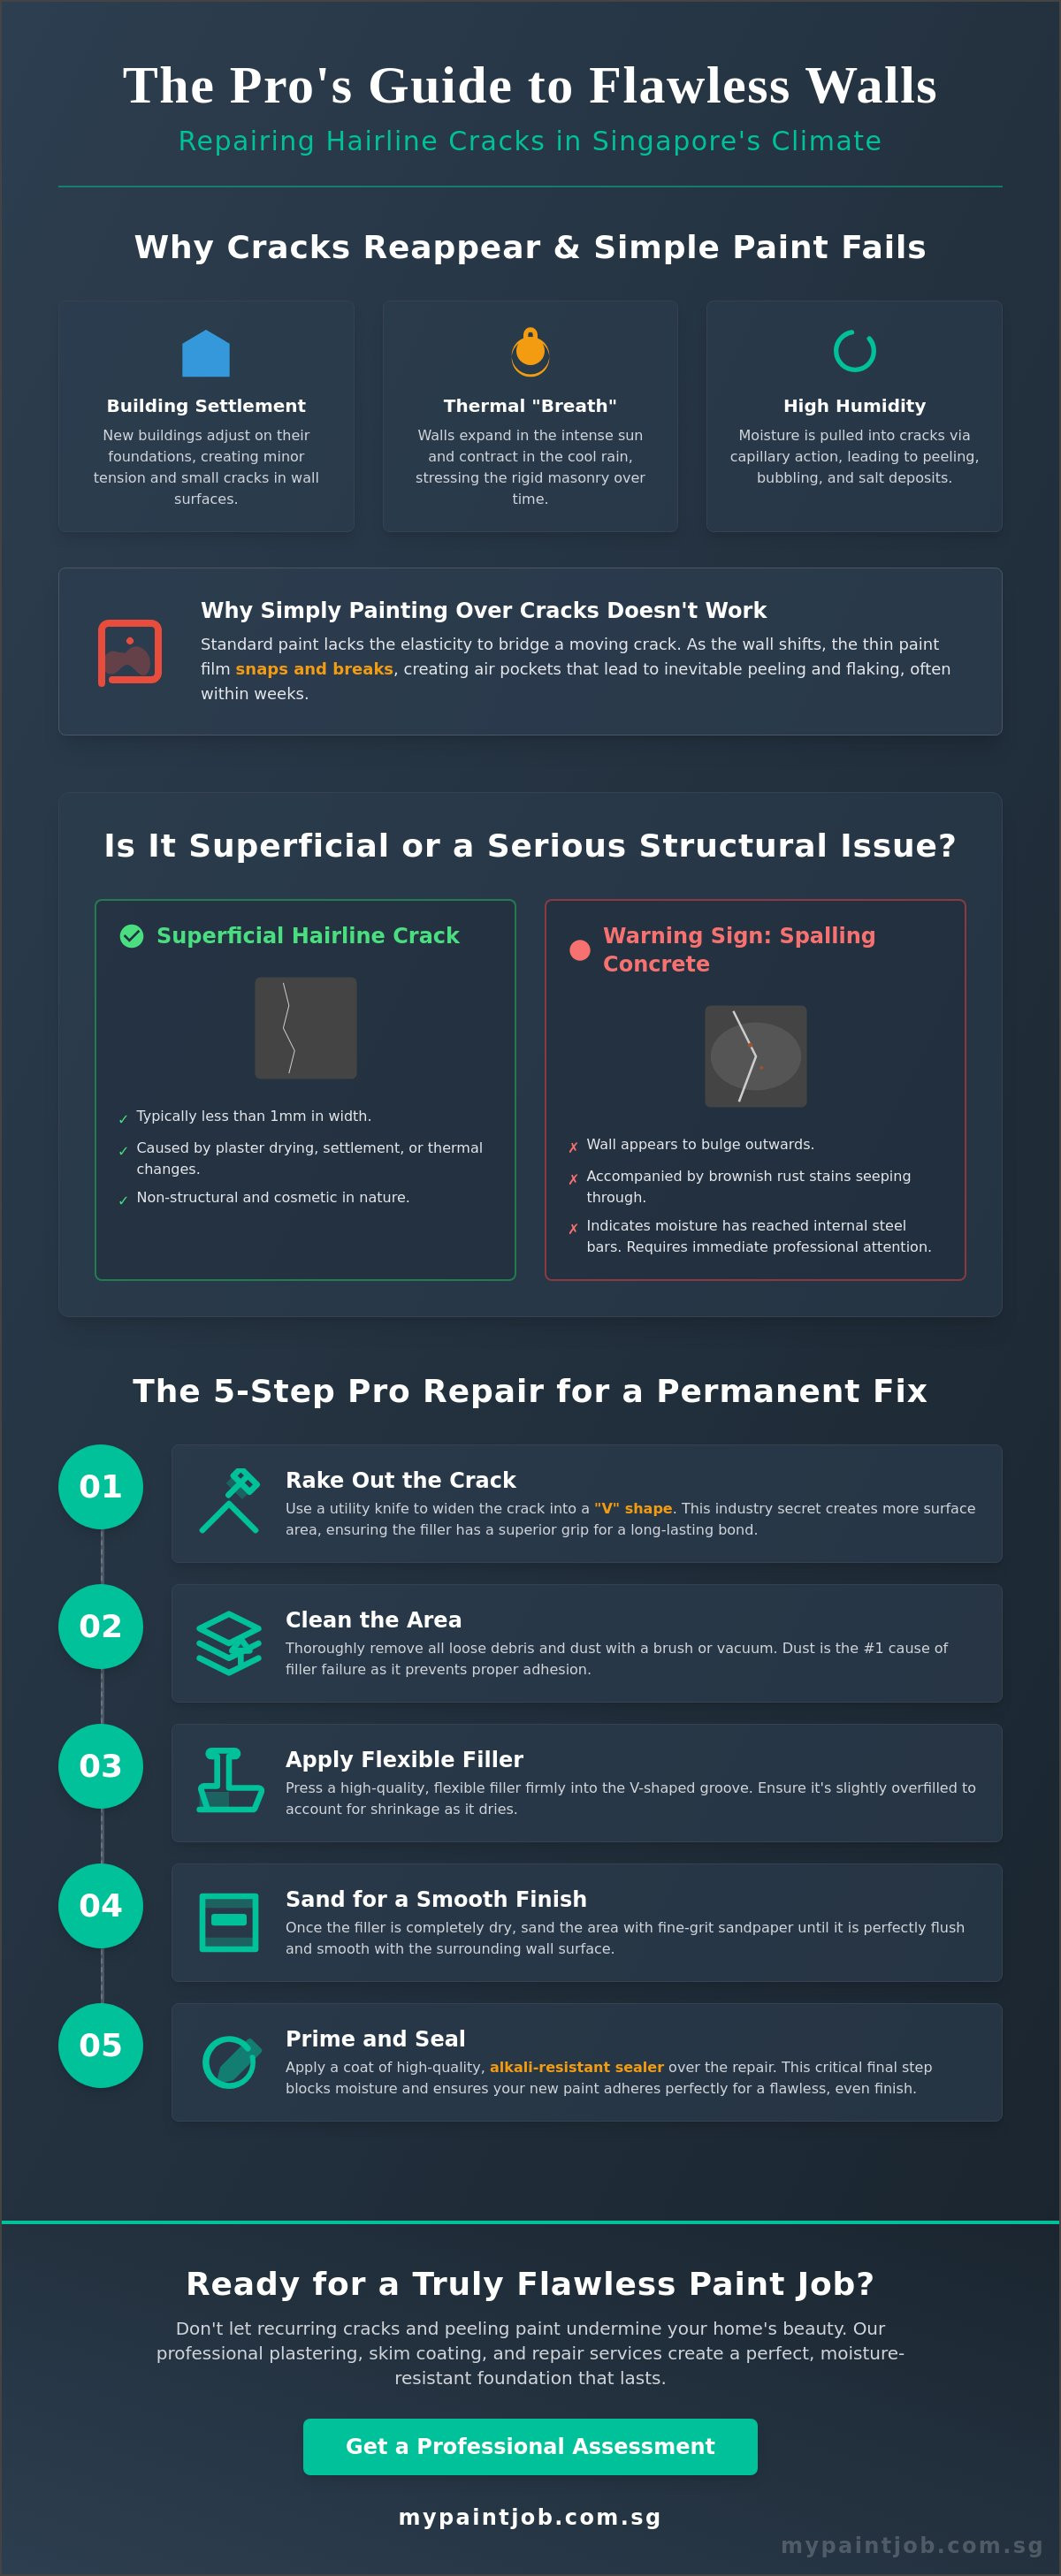
Hairline cracks are those tiny, spiderweb-like fissures that appear in the Plaster or render layer of your walls, usually measuring less than 1mm in width. While they often look like a disaster, they are usually surface imperfections rather than signs of your home falling down. A hairline crack is a non-structural surface rupture caused by the natural curing or movement of masonry. Understanding how to repair hairline cracks in walls before painting starts with identifying exactly what you are looking at.
Common Causes: From Settlement to Thermal Expansion
New HDB flats and condos undergo a period of settlement during their first few years as the building’s weight adjusts on its foundations. This creates minor tension in the wall surfaces. In Singapore, we also deal with “thermal breath.” Your walls literally expand under the intense afternoon sun and contract when the evening rain hits. This constant cycle of movement stresses the rigid masonry, leading to those familiar thin lines. While these cracks don’t threaten the building, they do create a pathway for moisture to seep into your living space.
Why You Cannot Simply Paint Over Them
Slapping a fresh coat of paint over a crack is a temporary fix that usually fails within weeks. Standard emulsion paint doesn’t have the elasticity to bridge a moving gap. If the crack opens even a fraction of a millimeter, the dried paint film will snap. This leaves tiny air pockets behind the surface, which eventually leads to unsightly peeling and flaking. Learning how to repair hairline cracks in walls before painting is the only way to ensure your wall remains smooth and stable through the monsoon season. Proper preparation creates a bond that paint alone cannot provide.
The Science of Wall Failure: Humidity and Moisture Seepage
Singapore’s high humidity levels, often exceeding 80%, turn every hairline crack into a hungry straw. Through a process called capillary action, moisture is pulled deep into the masonry. This isn’t just about water; it’s about the minerals it carries. When the water evaporates, it leaves behind white, powdery crystals known as efflorescence. These salty deposits expand and physically push your new paint away from the surface. If you want to know how to repair hairline cracks in walls before painting, you must first address this invisible moisture cycle. Applying a high-quality alkali-resistant sealer is your first line of defense to block this ingress.
When a Crack Signals Spalling Concrete
Sometimes, a crack is a warning of a deeper structural battle. Look for red flags like brownish rust stains or sections where the wall seems to bulge outward. These are signs that moisture has reached the steel reinforcement bars inside your HDB ceiling or wall slabs. Once the rebar corrodes, it expands, causing the concrete to crack and flake off. This condition, known as spalling concrete, requires immediate technical attention before any painting can begin. Ignoring these signals can lead to more costly repairs and safety concerns later on.
The Role of Moisture Seepage in Paint Peeling
Trapped moisture is the silent enemy of a flawless finish. When the sun heats your walls, that liquid turns into vapour. This gas creates pressure that forces the paint film to bubble and peel. To prevent this, ensure your plaster work is completely dry and properly sealed. A professional approach involves more than just filling a gap; it requires creating a moisture-proof barrier that keeps your walls breathable yet protected. If you want a lasting result, take the time to inspect your surfaces for any damp patches before you open a single tin of paint. Protect your property’s value by securing a surface that is truly ready for its transformation.
How to Repair Hairline Cracks Like a Pro: 5 Essential Steps
Achieving a gallery-grade finish requires a meticulous approach to preparation. If you want to know how to repair hairline cracks in walls before painting, follow these industry-vetted steps to ensure your repair is both invisible and permanent. We take great pride in these technical details because they form the foundation of any high-standard renovation.
- Step 1: Rake out the crack. Use a sharp utility knife to slightly widen the fissure into a “V” shape. This creates a larger surface area for the filler to grip, preventing it from simply sitting on top of the plaster.
- Step 2: Clean the area. Remove all loose debris and dust with a brush or a vacuum. Dust is the leading cause of filler failure. It acts as a barrier that prevents the repair material from bonding with the wall.
- Step 3: Apply flexible acrylic filler. Press a high-quality flexible filler into the gap using a putty knife. In our tropical climate, rigid plaster often snaps under thermal movement; a flexible acrylic compound moves with your home.
- Step 4: Sand flush. Once the filler has fully cured, use fine-grit sandpaper to level the repair. Aim for a transition so smooth you cannot feel the edge with your fingertips when you run them across the surface.
- Step 5: Prime and seal. Apply a dedicated primer-sealer over the patch before the final topcoat. This step equalizes the porosity of the wall, preventing the “flashing” effect where the repair shows through the finished paint.
Essential Tools for Wall Restoration
Gather your kit before you begin. You will need a sturdy scraper, a tub of flexible filler, fine-grit sandpaper (180 to 220 grit), and a clean damp cloth. Always choose materials specifically labeled as “flexible.” These products are engineered to withstand the expansion and contraction cycles common in local masonry. Having the right tools ensures you work with technical accuracy rather than just guesswork.
Pro Tip: Managing Drying Times in Humidity
Singapore’s humidity often hovers above 80%, which significantly slows down the evaporation process. Do not rush the sanding stage. If the filler “gums up” or sticks to your sandpaper, it is still damp inside. Allow at least double the manufacturer’s recommended drying time on rainy days to ensure a rock-solid foundation. If you want a guaranteed, durable result without the logistical stress, our professional HDB painting services include expert crack restoration as part of our standard preparation.
Why Professional Plastering is Key to a Flawless Paint Job
Patching a few lines is one thing, but achieving a truly flat surface on an older HDB wall is another challenge entirely. While you now know how to repair hairline cracks in walls before painting, applying those steps across an entire room requires immense patience and specialized tools. A full skim coating provides a fresh start for your masonry. This process ensures every square inch is level and resistant to the tropical humidity discussed earlier. Our hdb painting services singapore prioritize this level of detail because we believe your home deserves more than just a quick fix.
Choosing a professional service also brings the benefit of a technical warranty. We take great pride in our craftsmanship, and we want you to feel certain that those cracks won’t return after a single monsoon season. At My Paint Job, we don’t just apply color; we restore the integrity of your surfaces. We bridge the gap between simple utility and creative achievement by ensuring the canvas is perfect before the first drop of paint touches the wall.
The My Paint Job Approach to Wall Restoration
We treat every property with the same care we would our own. Our process begins with meticulous protection of your furniture and flooring to prevent any logistical headaches. We then perform a deep surface assessment to determine if your walls need targeted repair or a complete resurfacing. By using eco-friendly, premium paints that bridge minor imperfections, we ensure your home looks vibrant and stays healthy for years to come. Our goal is to provide a smooth, professional finish that stands the test of time.
When to Call the Experts
While we encourage homeowners to understand the process, some situations demand a specialist’s eye. If you notice cracks wider than 2mm or fissures following a staircase pattern along the mortar lines, put down the scraper. These can indicate structural shifts that go beyond simple settlement. Book a professional assessment to keep your house painting services journey stress-free and technically sound. We are here to offer specialized advisory services and bespoke solutions that reflect your individual style and safety needs.
Transform Your Walls with Confidence
Achieving a perfect wall finish in Singapore is about more than just aesthetics; it is about technical accuracy and long-term protection. You now understand that these thin fissures are often the result of thermal expansion and that simply painting over them leads to premature peeling. By mastering how to repair hairline cracks in walls before painting, you ensure that your next renovation provides both beauty and peace of mind. Proper preparation is the bridge between a temporary fix and a lasting creative achievement.
If the technical demands of rake-out, flexible filling, and skim coating feel overwhelming, our team is ready to partner with you. With over 10 years of HDB painting expertise, we specialize in meticulous surface preparation using premium eco-friendly materials. We take great pride in our modest roots and our commitment to high-standard results for every client. Your property is in safe, capable hands with our skilled specialists who understand the unique needs of local masonry.
Get a Professional Wall Assessment and Quote from My Paint Job
Take the first step toward a renewed and flawless environment today.
Frequently Asked Questions
Is it normal to have hairline cracks in a new HDB flat?
Yes, it is very common to find at least one minor defect per new flat, with hairline cracks being among the most reported surface imperfections. These usually occur because the building is settling into its foundations and the masonry materials are still curing. If you’ve recently collected your keys, remember that you have a one-year Defect Liability Period to report these issues for official rectification at no cost.
Can I use toothpaste or simple putty to fix wall cracks before painting?
No, you should avoid using toothpaste as it lacks the necessary bonding agents and will eventually shrink and flake off. While a basic putty might work for tiny nail holes, mastering how to repair hairline cracks in walls before painting requires a flexible acrylic filler. This specialized material is essential in Singapore because it can expand and contract with your walls during our daily temperature shifts.
How long should I wait for the filler to dry before applying paint?
You should generally wait at least 2 to 4 hours for minor repairs, but high humidity levels often extend this to a full 24 hours. Always perform a “touch test” to ensure the surface is bone-dry and firm. If you sand the area and the filler feels gummy or sticks to your sandpaper, it hasn’t finished curing and will likely cause your paint to bubble or peel later.
Will a thicker layer of paint hide the hairline cracks permanently?
No, a thick layer of paint is not a substitute for proper repair and will eventually snap as the crack underneath moves. Paint is designed to be a thin, decorative film rather than a structural bridge. If you don’t rake out and fill the crack properly first, the movement caused by the afternoon sun will force the crack to reappear through your new finish within weeks.
How do I know if a wall crack is structural and dangerous?
Look for cracks wider than 2mm, jagged horizontal fissures, or “staircase” patterns in the masonry, as these are signs of potential structural stress. You should also be alert for bulging plaster or rust stains, which indicate that moisture has reached the internal steel rebar. If you spot these red flags, stop your DIY project and book a professional assessment to ensure your home remains safe and sound.